Wednesday, December 24, 2008

Knowledgeware Optimization

This tutorial introduces the knowledgeware warning function and multi-parameter optimization. In this tutorial I model a simple room and use its dimensions and configuration to analyze surface area and volume. Using the values, the reverberation time is calculated. As a first attempt at using the engineering optimization tools I let the software determine the room dimensions based on appropriate reverberation times.

Click the image to begin the streaming video.


Sunday, November 30, 2008

Random Numbers for Framework

This video tutorial attempts to pull together a few of the previous examples. A powercopy is used to adapt to its height and to be divided based on a random number from an Excel design table. The Excel spreadsheet can be a powerful tool to control geometry.

Click the image to get to the streaming video.


Saturday, November 15, 2008

Generating Drawings

Short tutorial that explains how to generate drawings using the drawing workbench in Digital Project. Click the image to start the streaming video.

Tuesday, November 11, 2008

Framework Options

Short video tutorial describes three methods for the creation of frameworks for use with doc templates and powercopies . Click the image to start the video.

Thursday, November 6, 2008

Fire Installed


John and I finished the installation of the Fire project and the the opening occured last night. Once I get a chance to photograph it I will upload more. For now, here are some i-phone shots.

There is more up on John's blog: http://designedobjects.blogspot.com/.

And some images from the opening from Earl Carlson: http://www.theearlcarlson.com/duderstadt/fire.html


'Fire' from John Marshall on Vimeo.

Sunday, October 26, 2008

Unfolded PowerCopy

Tutorial that explains how to include unfolded geometry in a powercopy.
The tutorial also shows how to use local and global parameters.
18 minutes. Click the image for the video.

Arts & the Environment: FIRE

As part of a University of Michigan initiative to explore arts driven inquiry, Arts on Earth sponsored multidisciplinary faculty teams to develop work that explores environmental issues. Since the summer I have been working with John Marshall from the School of Art & Design and Werner Dahm from the Laboratory for Turbulence & Combustion (Department of Aerospace Engineering). We were given the element of fire.

The opening night of the installations / performances is on: November 5 from 5 - 11.
Here is a link to
Arts & the Environment.

A series of aluminum forms will hold an array of autonomous interactive units that will respond to the movement and environmental conditions around it. The behavior is obviously informed by the dynamic qualities of fire.


Saturday, October 18, 2008

Random Numbers linked from Excel

This tutorial will describe the creation of a design table, allowing for the control of geometry from an Excel spread sheet. The design table is also useful for input and output of data from Digital Project. Using the random number generator from Excel, a rule is created to randomly open or close the geometry of a powercopy.

Here is a link to the video.


Saturday, October 4, 2008

Grasshopper - Brick Surface

This grasshopper example places a series of boxes on a lofted surface. Currently it is an approximation of a brick surface. The next file will follow the rules for corbeling to set a maximum curvature based on a brick module.

Here is the grasshopper file.


Thursday, October 2, 2008

Grasshopper - Array of Boxes

Simple Grasshopper video tutorial that shows how to make a series of boxes re-orient themselves based on a point.
Beyond the simple re-orientation the file uses both a MAX and MIN to control the size of the boxes.

Click the image to watch the video.

Here is a link to the grasshopper file.


Digital Project - Tutorial 5 - Document Templates

This is the fifth and last comprehensive tutorial for the ParaMod seminar. The five tutorials should give everyone a basic understanding of many of functions. I will continue to add shorter more specific tutorials.


Document templates allow for advanced replicatiopn at the product level, each part of the syetem is a separate file.


Click the image below to view the 40 minute streaming video.


Tuesday, September 23, 2008

Digital Project - Tutorial 4 - Power Copies

Here is the fourth Digital Project tutorial developed for the ParaMod Seminar.

It is 45 minutes long and introduces advanced replication using a simple framework.

Click the image below to go to the streaming video.


Thursday, September 18, 2008

Digital Project - Tutorial 3 - Part to Whole

Here is the third Digital Project tutorial developed for the ParaMod Seminar.

It is 48 minutes long and introduces solids and part / product relationships.

Click the image below to go to the streaming video.


Wednesday, September 10, 2008

Digital Project - Tutorial 2 - Surfaces

Here is the second Digital Project tutorial developed for the ParaMod Seminar.


It is 65 minutes long and builds on tutorial 1. Here we will use the first sketch to drive the height and shape of the covering surface. At this point the form is less of a concern than learning how to develop the interactions.


Click the image below to go to the streaming video. I am still working on the best format / size/ player for the tutorials. This one is a bit large and takes a minute to load.


Monday, September 1, 2008

Digital Project - Tutorial 1 - The Sketch

Here is the first Digital Project tutorial developed for the ParaMod Seminar. It is 42 minutes long and covers the interface and the sketch. Let me know if I left anything out.

Click the image below to go to the streaming video.


ParaMod Seminar: Structural Density

It is that time of the year; back to school. This semester I will be running the ParaMod grad seminar at the Univ or Michigan School of Architecture. Rather than work with a different topic I am continuing the work that we started in the spring term. The seminar will again be looking at the relationship between structure and organization. Obviously the associativity and intelligence of the Digital Project modeling environment allows for various ways to explore the topic.

The plan is to post samples of the student work to share the research. A series of video tutorials will be developed to support the seminar work. I will be posting these tutorials here too.

Here is a link to the syllabus for the seminar.


Sunday, August 17, 2008

Parametric Wooden Strips

Here is an in progress project from our office. The small restaurant interior will be built with wood strips for the benches, bar, and ceiling. Keeping the strips vertical allows for them to be bent around the corners. Where the form pulls and pushes, light comes between the wood strips from behind.

A series of conical forms are used to control the radii of the wood strips. The more extreme the cone, the more open the gap in the strips.
A simple Catia diagram demonstrates the relationship between the cones and the strips. The parametric model allows for quick feedback between the manipulation of cone and the redulting affect of the strips and gaps.

Here is a link to a video of the Catia file.


An early rendering of the proposed space.

Back from traveling

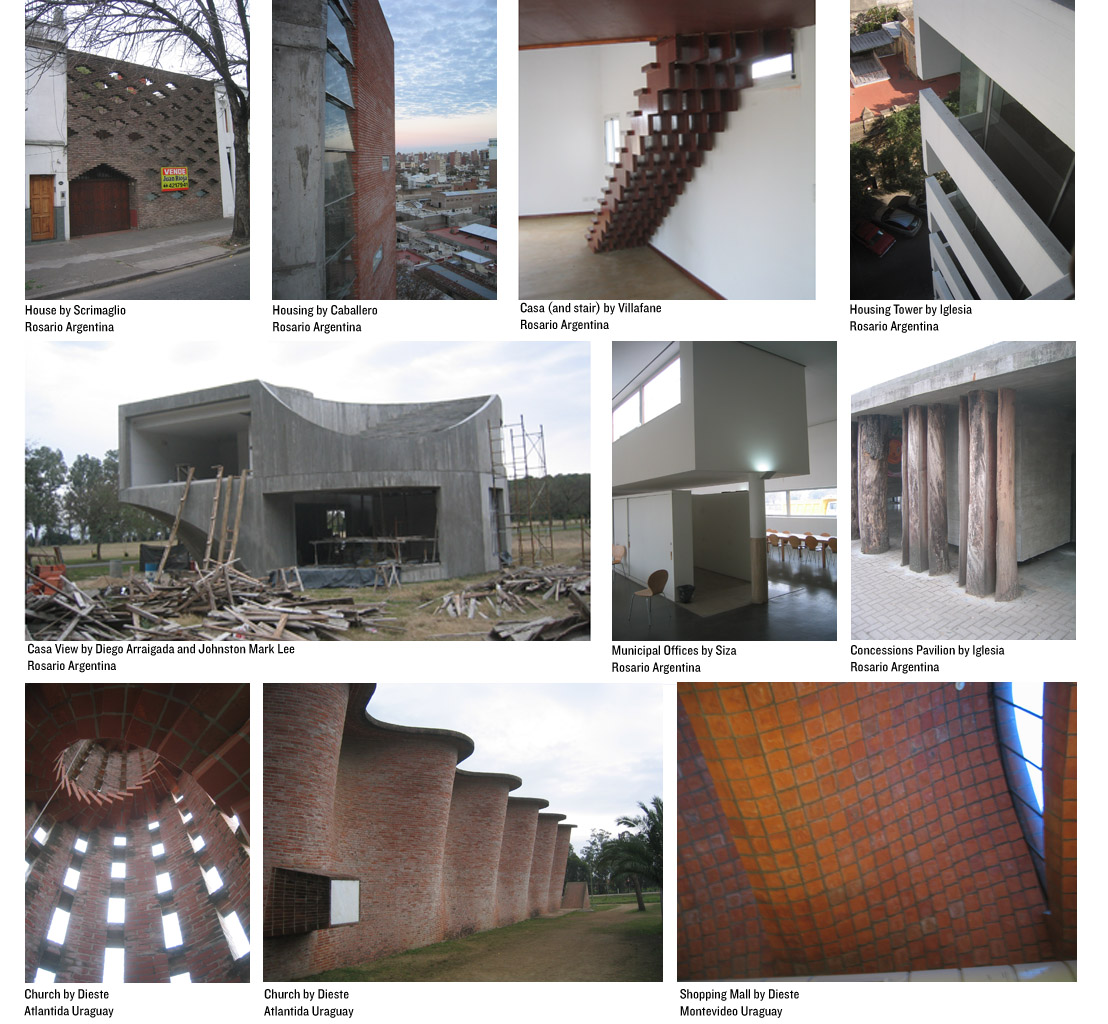
Sorry for no posts in a while. I just got back from a trip to Argentina and Uraguay. We lectured in Rosario and decided to spend some time there. Juan Rois from UIC organized a number of visits and meetings while we were there. We got to meet some of Argentina's best architects, went to their offices, and visited their projects under construction. Here is a sampling of the buildings (click for larger image).


We saw some amazing projects. The architects were all very open and interested in talking about similarities and differences between architecture and practice. The most striking difference is the role of labor. In Argentina the labor is less expensive but the materials are more expensive in comparison to the US. As a result, the use of brick and concrete (cheap materials) is more widespread and of much higher quality. The craft and time taken to build with masonry or fabricate on-site formwork is not a fearful proposition as it is in the US.

On top of Casa View with Diego, Juan, and Marcelo.

Waiting for our table. With Gerardo, Marcelo, Luis, Juan, Craig, and Jen.

And the steak... We ate some very good Argentinian beef while drinking very good wine from Mendoza.

Sunday, July 20, 2008

Spiral Revisited

This grasshopper project builds on an earlier exercise that built a spiral using simple transformations. While it is relatively simple to define a spiral mathematically, it is difficult to modify the strict form using the expression. If you are interested in the expression for a spiral, here is a link to the Google group posting.

The goal for this project was to have the first few points lay flat before changing elevation. The thought was this would give it a stable base.

Projecting the shape flat then allows for the creation of the "V" column at the termination of the spiral. A split, subset, and interval are used to create spokes between different parts of the spiral.


Here is a
link to the grasshopper file.

Sunday, July 13, 2008

Intro Rhino Tutorial 005 - Output: Maxwell Render

This is the 5th and last of the Rhino Intro Tutorials. The intro tutorials were completed for the incoming 3G1 studio for their second assignment. Additional Rhino Tutorials will deal with more advanced issues.


This tutorial takes the model from the previous tutorial and creates a simple exterior rendering. A sky and people are added with a couple of simple tricks in photoshop.

Here is a link to the 25 minute video tutorial.

Saturday, July 12, 2008

Spiral Structure - Grasshopper

While it is very easy to make a spiral with an equation, I took the approach to make a series of points that build (and translate) from the previous point. Once a series of 10 points have been created, an interpolate curve connects them and then these curves make surfaces. Dividing the curves a series of pipes connect points to form an in between structure.
As more rotation occurs between points, the curve must interpolate, creating oblong cuves.


While the file is not as elegant as I would like, the file includes shift and interval as a way to connect the various divide points. If anyone has a better idea how to repeat the multiple actions of the spiral, I would be open to hearing about it. As far as I know there is no loop function which would do the trick.


Download the grasshopper file here .


Tuesday, July 8, 2008

Rhino Tutorial Output: Vectors

The fourth tutorial models a simple massing and takes it through make2D and into Illustrator.

Here is a link to the 40 minute video.


Sunday, July 6, 2008

Illuminated Surface

Here is a small project that I have been working on for part of an installation. The surface (about 3'x3') will act as backdrop and light for a small table in a gallery. A series of back lights will be controlled interactively through interaction with furniture in the space.


Two splines are used to control a series of surfaces and the toolpaths used to mill the surface.


Here are the lines overlaid on the surfaces. At various points the surface splits to allow a small aperature to move from behind. The various iterations of the line drawings are made through the movement of the two splines. Digital Project was used to define the relationships and only after everything was worked out, the splines were modified to approximate the final proportions of the splines and aperatures.


The two renderings show the light from behind as trapped between the two surfaces. The final piece will be milled from plywood.

This series of models is more of a proof of concept for the aperatures. A new model will be developed using the splines, but using a different method to create a model with thickness. The current iteration is only one surface.

Saturday, June 28, 2008

Rhino Tutorial 003

The third tutorial deals with the construction of curves and surfaces through many of the various creation tools.

Here is a link to the 45 minute tutorial video.


Rhino Tutorial 002

The second Rhino Intro. Brief explanation of layer, properties, join, group, and construction planes.

Here is a link to the tutorial video.


Friday, June 27, 2008

Rhino Tutorial 001

As a means to try and capture some of the work that I tend to do every year, a series of software tutorials will be added to the site. This tutorial is the first in the rhino series and explains issues of interface, simple operations, and navigation.

Here is a link to the tutorial.


Thursday, June 26, 2008

Digital Project Honeycombs

The post for today is an excert from a project that used digital project to build responsive honeycomb structures. The main goal was to work with rules (rule firing in digital project). In this case, as the cells are stretched, the average cell size is computed. The light gray shows the geometric constraints for the cells.

Then as the individual cell is made larger or smaller than the average size, it is made deep/shallow or thick/think. This variation is visible in the iterations below. This level of analysis adds a level of removal from the designer. One cannot be sure where the depth will shift.

Variations are rendered to give some sense of the range of variation possible. I will be gearing up for class in the fall and will post tutorials on document templates and rule firing, check back.

Monday, June 23, 2008

Point Distance Surface

Building on a couple of the Grasshopper tutorials and trying to include a couple of new commands I developed a surface that responds to a location of a point. The video shows the interactions of the various sliders.


For a bigger video click here .


Making a few tweeks with the sliders and then baking each, the variations from a screen shot below. Unfortunately I could not find a way to trim in grasshopper so this task is completed once the geometry is baked.


When selecting the point, make sure "point" is selected in Rhino. If "coordinate" is selected you can make a point, but you will not be able to move it around.


Revised file based on some feedback from Gabe. My trim is a bit messy because I could not get it to subtract the correct side. I exploded the surfaces to get the final trim. Here is a link to the grasshopper file.